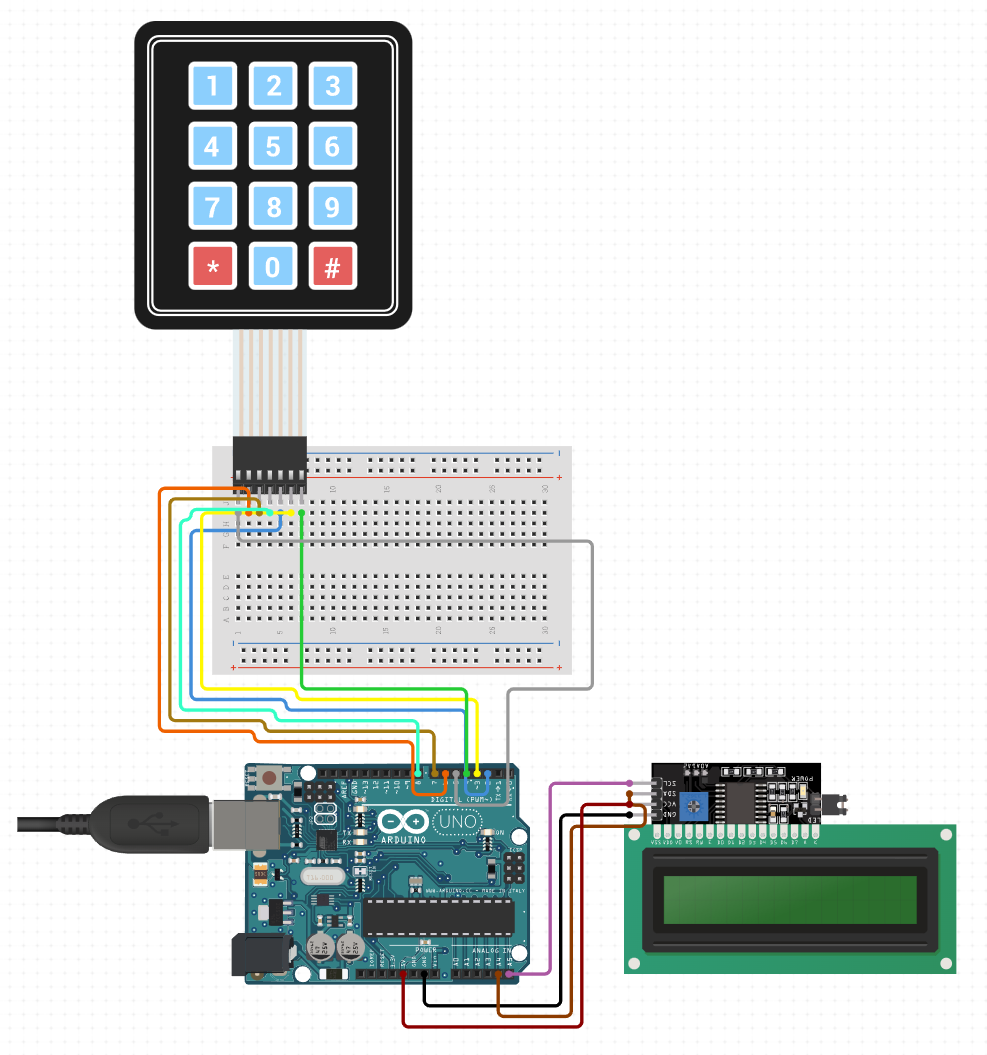
회로도
과제 수행 순서
1. LCD 화면에 글자 출력
2. 키패드 입력 값을 시리얼 모니터로 출력
3. 출력된 값을 LCD에 표시하기
4. 비밀번호 입력해서 해당 비밀번호가 맞으면 “PASS” 띄우기
1. LCD 화면에 글자 출력
이전 과제와 동일하므로 생략하겠다.
간단히 설명하자면 LCD가 연결 된 포트를 찾아 LCD 화면에 테스트 시 설정한다.
2. 키패드 입력 값을 시리얼 모니터로 출력
아두이노 라이브러리에서 keypad(https://www.arduino.cc/reference/en/libraries/keypad/)를 추가하고,
예제중에 3X4 코드는 확인되지 않아 3X4로 수정하여 사용하였다. 참고자료를 확인하면 좀 더 심화 설명이 되어 있다.
#include <Keypad.h>

const byte ROWS = 4; //4 행
const byte COLS = 3; //3 열
//define the cymbols on the buttons of the keypads
char hexaKeys[ROWS][COLS] = {
  {'1','2','3'},
  {'4','5','6'},
  {'7','8','9'},
  {'*','0','#'}
};
byte rowPins[ROWS] = {2, 3, 4, 5}; //행들을 담당하는 포트들
byte colPins[COLS] = {6, 7, 8}; //열들을 담당하는 포트들

//initialize an instance of class NewKeypad
Keypad customKeypad = Keypad( makeKeymap(hexaKeys), rowPins, colPins, ROWS, COLS);

void setup(){
  Serial.begin(9600);
}

void loop(){
  char customKey = customKeypad.getKey();

  if (customKey){
    Serial.println(customKey);
  }
}
키패드로 입력 시 시리얼 모니터에 입력한 번호나 문자가 출력된다.
3. 출력된 값을 LCD에 표시하기
#include <Wire.h>
#include <LiquidCrystal_I2C.h>
#include <Keypad.h>

const byte ROWS = 4;
const byte COLS = 3;
const int MAX_DIGITS = 4;  // 최대 입력가능한 자리 수

char hexaKeys[ROWS][COLS] = {
  {'1', '2', '3'},
  {'4', '5', '6'},
  {'7', '8', '9'},
  {'*', '0', '#'}
};

//lcd 포트 설정
LiquidCrystal_I2C lcd(0x3F, 16, 2);

byte rowPins[ROWS] = {2, 3, 4, 5};
byte colPins[COLS] = {6, 7, 8};

Keypad customKeypad = Keypad(makeKeymap(hexaKeys), rowPins, colPins, ROWS, COLS);

String currentText = "";  // 입력된 숫자를 저장할 변수

void setup() {
  Serial.begin(9600);
  lcd.begin();  // 크기 지정 없이 초기화

  // LCD 초기화
  lcd.setCursor(0, 0);
  lcd.print("Enter numpad:");
  lcd.setCursor(0, 1);
  lcd.cursor();
}

void loop() {
  char customKey = customKeypad.getKey();//키패드로 입력받은 값을 저장하는 변수 설정

  if (customKey) {
    Serial.println(customKey);//시리얼 모니터로 받은 값 출력

    // '*' 키가 눌렸을 때 currentText 초기화
    if (customKey == '*') {
      currentText = "";
    } else if (currentText.length() < MAX_DIGITS) {
      // 현재 문자열 길이가 MAX_DIGITS 이하인 경우에만 추가(현재 4자리)
      currentText += customKey;
    }

    // LCD에 입력받은 값 출력
    lcd.clear();
    lcd.setCursor(0, 0);
    lcd.print("Enter numpad:");
    lcd.setCursor(0, 1);
    lcd.print(currentText);
  }
}
입력 된 값이 lcd에 출력 된다.
4. 비밀번호를 설정 후 입력하여 비밀번호가 맞으면 “PASS” 띄우기 <= 생략가능
추가적으로 최초 비밀번호 설정 시, 숫자가 나오고, 비밀번호 입력 시 숫자가 나오지 않도록 설정 하였다.
#include <Wire.h>
#include <LiquidCrystal_I2C.h>
#include <Keypad.h>

const byte ROWS = 4;
const byte COLS = 3;
const int MAX_DIGITS = 4;  // 최대 숫자 자릿수

char hexaKeys[ROWS][COLS] = {
  { '1', '2', '3' },
  { '4', '5', '6' },
  { '7', '8', '9' },
  { '*', '0', '#' }
};

LiquidCrystal_I2C lcd(0x3F, 16, 2);

byte rowPins[ROWS] = { 2, 3, 4, 5 };
byte colPins[COLS] = { 6, 7, 8 };

Keypad customKeypad = Keypad(makeKeymap(hexaKeys), rowPins, colPins, ROWS, COLS);

String password = "";     // 최초 패스워드를 저장할 변수
String currentText = "";  // 입력된 숫자를 저장할 변수
String passText = "";     // 패스워드 가리는 용 변수

bool passwordSet = false;  // 최초 패스워드 설정 여부를 나타내는 플래그

void setup() {
  Serial.begin(9600);
  lcd.begin();  // 크기 지정 없이 초기화

  // LCD 초기화
  lcd.setCursor(0, 0);
  lcd.print("Set Password : ");
  lcd.setCursor(0, 1);  // (0, 1) 위치로 이동
  lcd.blink();
}

void loop() {
  char customKey = customKeypad.getKey();

  if (customKey) {
    Serial.println(customKey);
    // '*' 키가 눌렸을 때, 최초 패스워드 설정 또는 확인
    if (customKey == '*') {
      if (!passwordSet) {  // 최초 패스워드 설정
        password = currentText;
        passwordSet = true;  // 패스워드 설정 완료
        lcd.clear();
        lcd.setCursor(0, 0);
        lcd.print("Password Set!");
        delay(2000);  // 결과를 표시한 후 2초 동안 대기
        lcd.setCursor(0, 0);
        lcd.print("Enter Password:");
      } else {  // 최초 패스워드 설정 이후, 패스워드 확인
        lcd.clear();
        lcd.setCursor(0, 0);
        lcd.print("Checking...");
        delay(1000);  // 결과를 표시한 후 1초 동안 대기

        if (currentText == password) {
          lcd.clear();
          lcd.setCursor(0, 0);
          lcd.print("PASS");
        } else {
          lcd.clear();
          lcd.setCursor(0, 0);
          lcd.print("WRONG");
        }

        delay(2000);  // 결과를 표시한 후 2초 동안 대기
        lcd.clear();
        lcd.setCursor(0, 0);
        lcd.print("Enter Password:");
        lcd.setCursor(0, 1);
        lcd.blink();
      }

      // 입력 초기화
      currentText = "";
      passText = "";
    } else if (currentText.length() < MAX_DIGITS) {
      // 현재 문자열 길이가 MAX_DIGITS 이하이고 최초 패스워드가 설정되었을 때만 추가
      currentText += customKey;
      passText += passwordSet ? '*' : customKey;//3항 연산자 / passwordSet의 true false 여부에 따라 표시 방법이 달라진다. 아래 if문으로 대체가능
      /*
      if (passwordSet) {
        passText += '*';  // 만약 passwordSet이 true이면 '*' 문자를 추가
      } else {
        passText += customKey;  // 그렇지 않으면 customKey 문자를 추가
      }
      */
    }

    // LCD에 출력
    lcd.setCursor(0, 1);
    lcd.print(passText);
  }
}
시연 영상
<참고자료>키패드 : https://blog.naver.com/pareko/220326054196
3x4 키패드 사용하기
3X4 키패드 1. 아두이노와 키패드 연결 왼쪽부터 1...7 1번 : 첫줄 가로 (1,2,3) --- ...
blog.naver.com
'아두이노 > 아두이노 과제' 카테고리의 다른 글
| 모터 드라이버 L298N 모듈을 이용한 DC 모터 제어 (0) | 2024.07.18 |
|---|---|
| 가변저항을 통한 LED 점등 속도 제어 (0) | 2024.07.18 |
| 버튼을 통한 LED 제어 (0) | 2024.07.17 |
| 아두이노 보드 구성 (0) | 2024.01.02 |
| 아두이노에서 LCD 화면에 가변저항으로 받은 값 출력 (2) | 2023.12.27 |


